Angular をチュートリアルを使って勉強する機会があったので、その時の内容について説明していきます。
Angular の本家サイトのチュートリアルの「 Routing 」の説明をしていきたいと思います。
Routing により、ビューの切り替えができるようになります。今回はダッシュボードビューを追加して、詳細画面と一覧画面を相互に移動できる機能を実装していきたいと思います。
本家サイトはこちらになります。
作成するプロジェクトは「 Tour of Heroes 」というアプリケーションです。
作成するアプリの概要についてはこちらから確認できます。
では、早速始めていきたいと思います!
開発環境
- macOS : Sierra 10.12.6
- node : 8.4.0
- npm : 5.3.0
- Angular : 4.3.6
AppRoutingModule の追加
下記コマンドを実行して AppRoutingModule を追加します。
$ ng generate module app-routing --flat --module=app作成された app-routing.module.ts というファイルの中身はこんな感じです。
import { NgModule } from '@angular/core';
import { CommonModule } from '@angular/common';

@NgModule({
  imports: [
    CommonModule
  ],
  declarations: []
})
export class AppRoutingModule { }
Routing では CommonModule ではなく、 RouterModule と Routes を使用するので、インポート部分を修正します。
また、 RouterModule をエクスポートする必要があるので、 @NgModule の部分も修正します。
app-routing.module.ts を修正するとこのようになります。
import { NgModule }             from '@angular/core';
import { RouterModule, Routes } from '@angular/router';

@NgModule({
  exports: [ RouterModule ]
})
export class AppRoutingModule {}
ルートの追加
ルーティングに関する情報を定義していきます。パスとコンポーネントを設定していきます。
app-routing.module.ts にコンポーネントのインポート文とルートの定義を行います。
import { NgModule } from '@angular/core';
import { RouterModule, Routes } from '@angular/router';

import { HeroesComponent} from './heroes/heroes.component';

const routes: Routes = [
  { path: 'heroes', component: HeroesComponent }
];

@NgModule({
  exports: [ RouterModule ]
})
export class AppRoutingModule {}
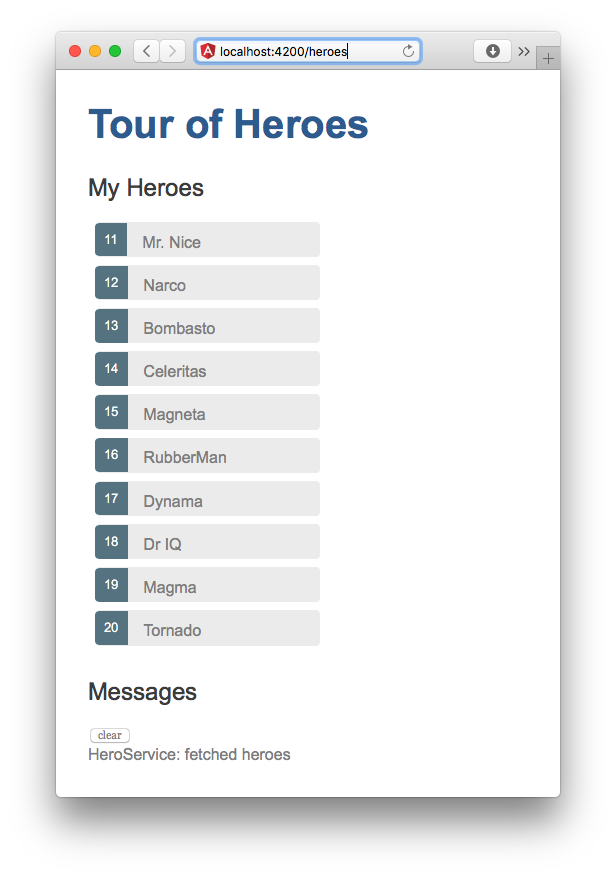
ここまで実装した状態で、 ng server コマンドでアプリを実行して、「 http://localhost:4200/heroes 」にアクセスすると、以下の画面が表示されるようになります。

RouterModule.forRoot()
RouterModule を利用してルートをインポートします。 app-routing.module.ts の @NgModule を下記のように編集します。
@NgModule({
  imports: [ RouterModule.forRoot(routes) ],
  exports: [ RouterModule ]
})
RouterOutlet の追加
app.component.html を編集し、 router-outlet という要素を追加します。 router-outlet の要素の所にルーティングされたビューが表示されるようになります。
<h1>{{title}}</h1>
<router-outlet></router-outlet>
<app-messages></app-messages>
この状態で ng serve コマンドを実行すると「 http://localhost:4200 」にアクセスしてもタイトルだけが表示されますが、「 http://localhost:4200/heroes 」にアクセスすると、一覧と詳細のビューが表示されるようになります。
navigation link ( routerLink )の追加
app.component.html に navigation link を追加します。
これを追加することで、 navigation link に設定したリンクへ移動することができるようになります。
<h1>{{title}}</h1>
<nav>
  <a routerLink="/heroes">Heroes</a>
</nav>
<router-outlet></router-outlet>
<app-messages></app-messages>
ダッシュボードビューの追加
ダッシュボードビューを追加していきます。
まずは、コンポーネントを追加します。
ng generate component dashboard追加されたファイルをそれぞれ編集していきます。
dashboard.component.html
<h3>Top Heroes</h3>
<div class="grid grid-pad">
  <a *ngFor="let hero of heroes" class="col-1-4">
    <div class="module hero">
      <h4>{{hero.name}}</h4>
    </div>
  </a>
</div>
dashboard.component.ts
import { Component, OnInit } from '@angular/core';
import { Hero } from '../hero';
import { HeroService } from '../hero.service';

@Component({
  selector: 'app-dashboard',
  templateUrl: './dashboard.component.html',
  styleUrls: [ './dashboard.component.css' ]
})
export class DashboardComponent implements OnInit {
  heroes: Hero[] = [];

  constructor(private heroService: HeroService) { }

  ngOnInit() {
    this.getHeroes();
  }

  getHeroes(): void {
    this.heroService.getHeroes()
      .subscribe(heroes => this.heroes = heroes.slice(1, 5));
  }
}
dashboard.component.css
/* DashboardComponent's private CSS styles */
[class*='col-'] {
  float: left;
  padding-right: 20px;
  padding-bottom: 20px;
}
[class*='col-']:last-of-type {
  padding-right: 0;
}
a {
  text-decoration: none;
}
*, *:after, *:before {
  -webkit-box-sizing: border-box;
  -moz-box-sizing: border-box;
  box-sizing: border-box;
}
h3 {
  text-align: center; margin-bottom: 0;
}
h4 {
  position: relative;
}
.grid {
  margin: 0;
}
.col-1-4 {
  width: 25%;
}
.module {
  padding: 20px;
  text-align: center;
  color: #eee;
  max-height: 120px;
  min-width: 120px;
  background-color: #607D8B;
  border-radius: 2px;
}
.module:hover {
  background-color: #EEE;
  cursor: pointer;
  color: #607d8b;
}
.grid-pad {
  padding: 10px 0;
}
.grid-pad > [class*='col-']:last-of-type {
  padding-right: 20px;
}
@media (max-width: 600px) {
  .module {
    font-size: 10px;
    max-height: 75px; }
}
@media (max-width: 1024px) {
  .grid {
    margin: 0;
  }
  .module {
    min-width: 60px;
  }
}
ダッシュボードのルートを追加する
app-routing.module.ts にダッシュボードコンポーネントをルートとして追加します。
DashboardComponent をインポートします。
import { DashboardComponent } from './dashboard/dashboard.component';routes に DashboardComponent を追加します。
const routes: Routes = [
  { path: 'heroes', component: HeroesComponent },
  { path: 'dashboard', component: DashboardComponent },
];
デフォルトルートの追加
router-outlet にデフォルトで表示するビューの情報をルートとして、 app-routing.module.ts の routes に追加します。
const routes: Routes = [
  { path: '', redirectTo: '/dashboard', pathMatch: 'full' },
  { path: 'heroes', component: HeroesComponent },
  { path: 'dashboard', component: DashboardComponent },
];
ダッシュボードビューへのリンクの追加
app.component.html にダッシュボードビューへのリンクを追加します。
<h1>{{title}}</h1>
<nav>
  <a routerLink="/dashboard">Dashboard</a>
  <a routerLink="/heroes">Heroes</a>
</nav>
<router-outlet></router-outlet>
<app-messages></app-messages>
詳細画面へのナビゲーション
詳細画面へ移動するケースは下記の3通りとなります。
- ダッシュボードの
heroをクリックした場合 hero listからheroをクリックした場合- ブラウザのURL入力欄から直接詳細画面へアクセスされた場合(URL直入力)
HeroesComponent から hero details の削除
今までは HeroesComponent を呼び出した際に詳細画面も一緒に表示していましたが、これからは画面遷移してから表示するようになるので、 heroes.component.html から詳細画面に関するタグ( app-hero-detail )を削除します。
タグを削除した後の heroes.component.html は以下のようになります。
<h2>My Heroes</h2>

<ul class="heroes">
  <li *ngFor="let hero of heroes"
      [class.selected]="hero === selectedHero"
      (click)="onSelect(hero)">
    <span class="badge">{{hero.id}}</span> {{hero.name}}
  </li>
</ul>
hero detail のルートを追加する
詳細画面は ~/detail/11 のようなURLでナビゲーションします。 11 は id となっています。
app-routing.module.ts を編集します。
まず、 HeroDetailComponent をインポートします。
import { HeroDetailComponent } from './hero-detail/hero-detail.component';routes に HeroDetailComponent を追加します。
const routes: Routes = [
  { path: '', redirectTo: '/dashboard', pathMatch: 'full' },
  { path: 'dashboard', component: DashboardComponent },
  { path: 'detail/:id', component: HeroDetailComponent },
  { path: 'heroes', component: HeroesComponent }
];
DashboardComponent の詳細画面へのリンクについて
DashboardComponent に詳細画面へのリンクを追加します。 dashboard.component.html を編集します。
<h3>Top Heroes</h3>
<div class="grid grid-pad">
  <a *ngFor="let hero of heroes" class="col-1-4"
     routerLink="/detail/{{hero.id}}">
    <div class="module hero">
      <h4>{{hero.name}}</h4>
    </div>
  </a>
</div>
HeroesComponent の詳細画面へのリンクについて
HeroesComponent に詳細画面へのリンクを追加します。 heroes.component.html を編集します。
<h2>My Heroes</h2>

<ul class="heroes">
  <li *ngFor="let hero of heroes">
    <a routerLink="/detail/{{hero.id}}">
      <span class="badge">{{hero.id}}</span> {{hero.name}}
    </a>
  </li>
</ul>
コードの削除
HeroesComponent で利用しなくなった onSelect() メソッドと selectedHero プロパティを削除します。
削除後の heroes.component.ts の HeroesComponent クラスは以下のようになります。
export class HeroesComponent implements OnInit {
  heroes: Hero[];

  constructor(private heroService: HeroService) { }

  ngOnInit() {
    this.getHeroes();
  }

  getHeroes(): void {
    this.heroService.getHeroes()
    .subscribe(heroes => this.heroes = heroes);
  }
}
HeroDetailComponent をルーティングできるようにする
今のままでは HeroDetailComponent のルーティングはきちんと動かないので、 hero-detail.component.ts に修正を加えていきます。
インポート文を追加します。
import { ActivatedRoute } from '@angular/router';
import { Location } from '@angular/common';

import { HeroService }  from '../hero.service';
constructor に変数を追加します。
constructor(
  private route: ActivatedRoute,
  private heroService: HeroService,
  private location: Location
) {}
ルーティングのパラメータであるidの抽出
getHero() を次のように記述し、 ngOnInit() にも追加していきます。
ngOnInit(): void {
  this.getHero();
}

getHero(): void {
  const id = +this.route.snapshot.paramMap.get('id');
  this.heroService.getHero(id)
    .subscribe(hero => this.hero = hero);
}
HeroService に getHero() を追加する
HeroService を開いて、 getHero() メソッドを追加します。
getHero(id: number): Observable<Hero> {
  // Todo: send the message _after_ fetching the hero
  this.messageService.add(`HeroService: fetched hero id=${id}`);
  return of(HEROES.find(hero => hero.id === id));
}
戻る処理の追加
今のままではブラウザバック以外の「戻る」手段がないので、「戻る」ボタンを配置して、戻る処理を明示的に実行できるようにします。
hero-detail.component.html に戻るボタンを追加します。
<div *ngIf="hero">
  <h2>{{ hero.name | uppercase }} Details</h2>
  <div><span>id: </span>{{hero.id}}</div>
  <div>
    <label>name:
      <input [(ngModel)]="hero.name" placeholder="name"/>
    </label>
  </div>
  <button (click)="goBack()">go back</button>
</div>
「戻る」ボタンに対応する処理を hero-detail.component.ts に記述していきます。
goBack(): void {
  this.location.back();
}
完成イメージ
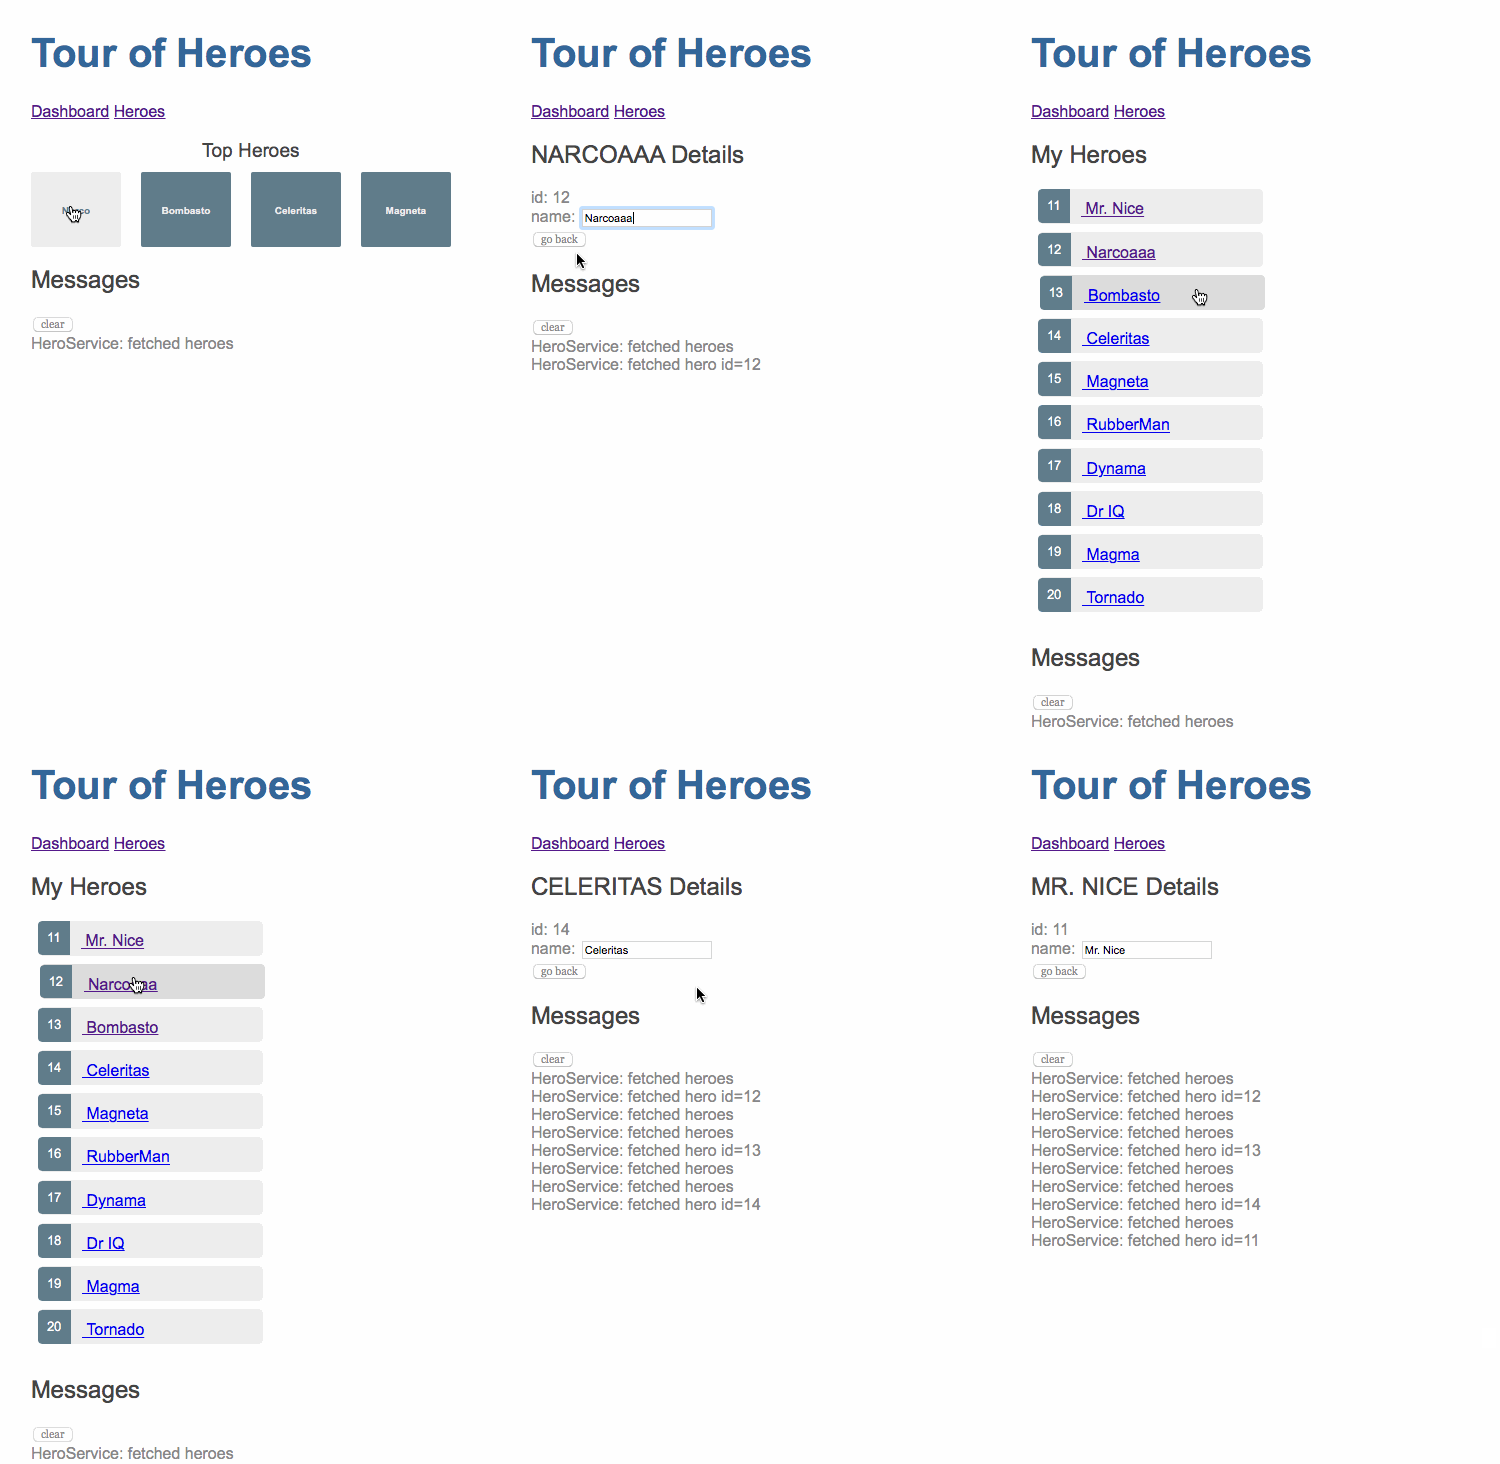
チュートリアルが完了するとこんな感じで動きます。

ソースコードについて
今までのソースコードは Github にあげてますので、詳細を確認したい方はこちらからソースコードを見てもらえればと思います。
最後に
今回のチュートリアルでルーティングの実装ができるようになりました。 SPA ( Single Page Application )もアリだとは思いますが、業務系のシステムなどでは画面遷移できないと実現できないような機能や画面もあると思うので、今回勉強したルーティングの知識を活用して画面遷移可能なアプリケーションを構築していければと思います。


コメント